Category Archives: article list

Thinking Beyond the Soft Palate: Vibrating the Sella Turcica

The voice needs a core. I’ve always thought of this core as a pointy little sound that happens somewhere in the middle of my head. One can, of course (and should), build something bigger around this core, but first the voice needs a steady hearth to live by. As famed vocal pedagogue Giovanni Lamperti put it:

Not until the focus of voice is like a fixed star in your head, kept in position by the powers inside and outside your body, can you sing1.

Finding this core to the sound is part of the process of developing resonance, and like many aspects of vocal technique, involves improving your ability to perceive — to feel — what is going on in your body.

One of the relevant areas is the soft palate, the part of the roof of your mouth behind the bony hard palate. This area moves a lot during phonation, and there is generally much talk about what you should be doing with it while singing. I have no intention of addressing the issue here. Instead, I want to talk about using the sensation of vibration in the bone above the soft palate as a meditation for resonance.

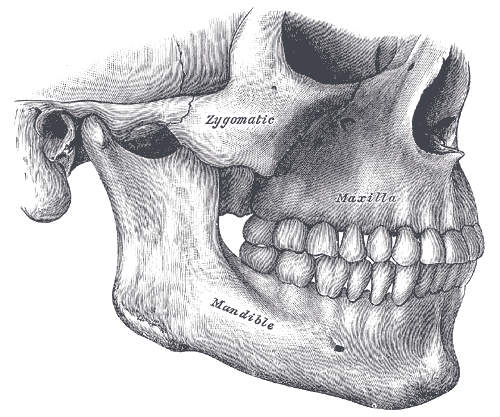
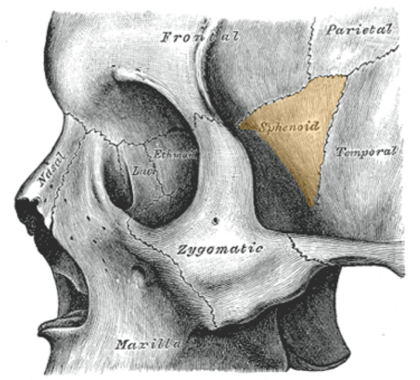
Some weeks ago, I talked about the idea of movement between the different bones of the skull, specifically looking at the maxilla, which holds the upper teeth, and forms most of the hard palate. Today’s bone-for-reflection, which hovers above the soft palate and the nasopharynx, is arguably the most beautifully-shaped bone in the body: the sphenoid.

Anterior view of the sphenoid
Is it a bird? Is it a moth? No! It’s an anterior view of the sphenoid! Illustration from an unknown work on anatomy, circa 1830. Image credit: Wellcome Library, London.

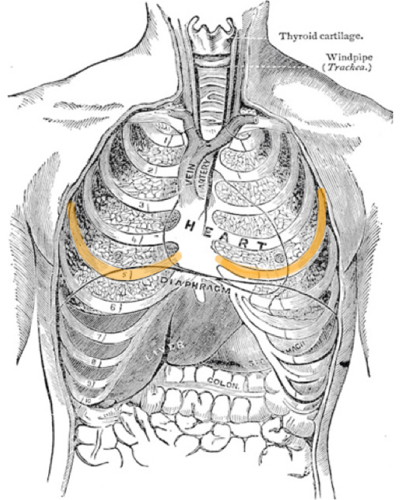
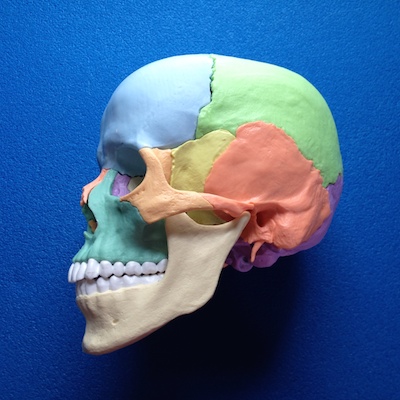
Most of the surfaces of the sphenoid are inaccessible to touch. We can feel its greater wings at the temples, just behind the outer edges of the eye sockets:

View of the side of the skull showing the location of the sphenoid bone at the temple.

(We can also touch its insect-leg-like hamular process inside the mouth, but you’ll have to ask your friendly craniosacral therapist for help with that one.)

The part of the sphenoid I want to focus on for the moment is a structure which lies directly above the soft palate called the sella turcica, and yes, that means “Turkish saddle.” It’s a cradle of bone on the inside floor of the skull which rocks the pituitary gland.

A Turkish saddle, high in the front and back, just like our friendly pituitary cradle. Illustration by Sir Henry Austen Layard: Nineveh and Babylon, 1882.

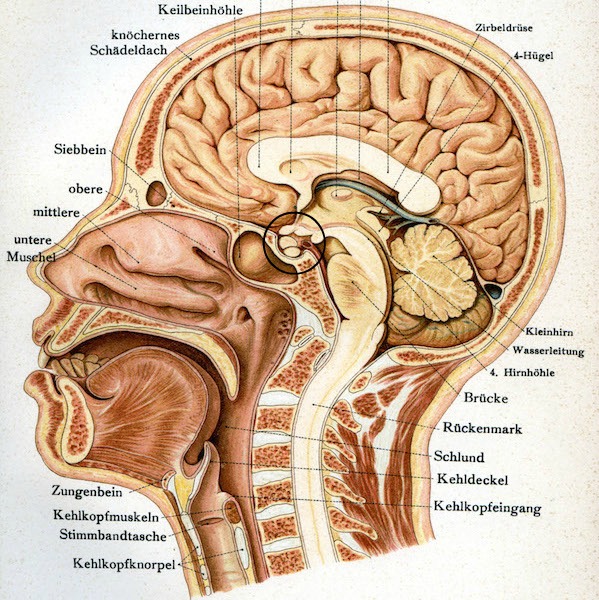
And because you should never look at just one anatomical illustration if you can look at five, I offer three public-domain images showing the location of the sella turcica in a sagittal view of the head (get thee to the interwebs if you want to find more).

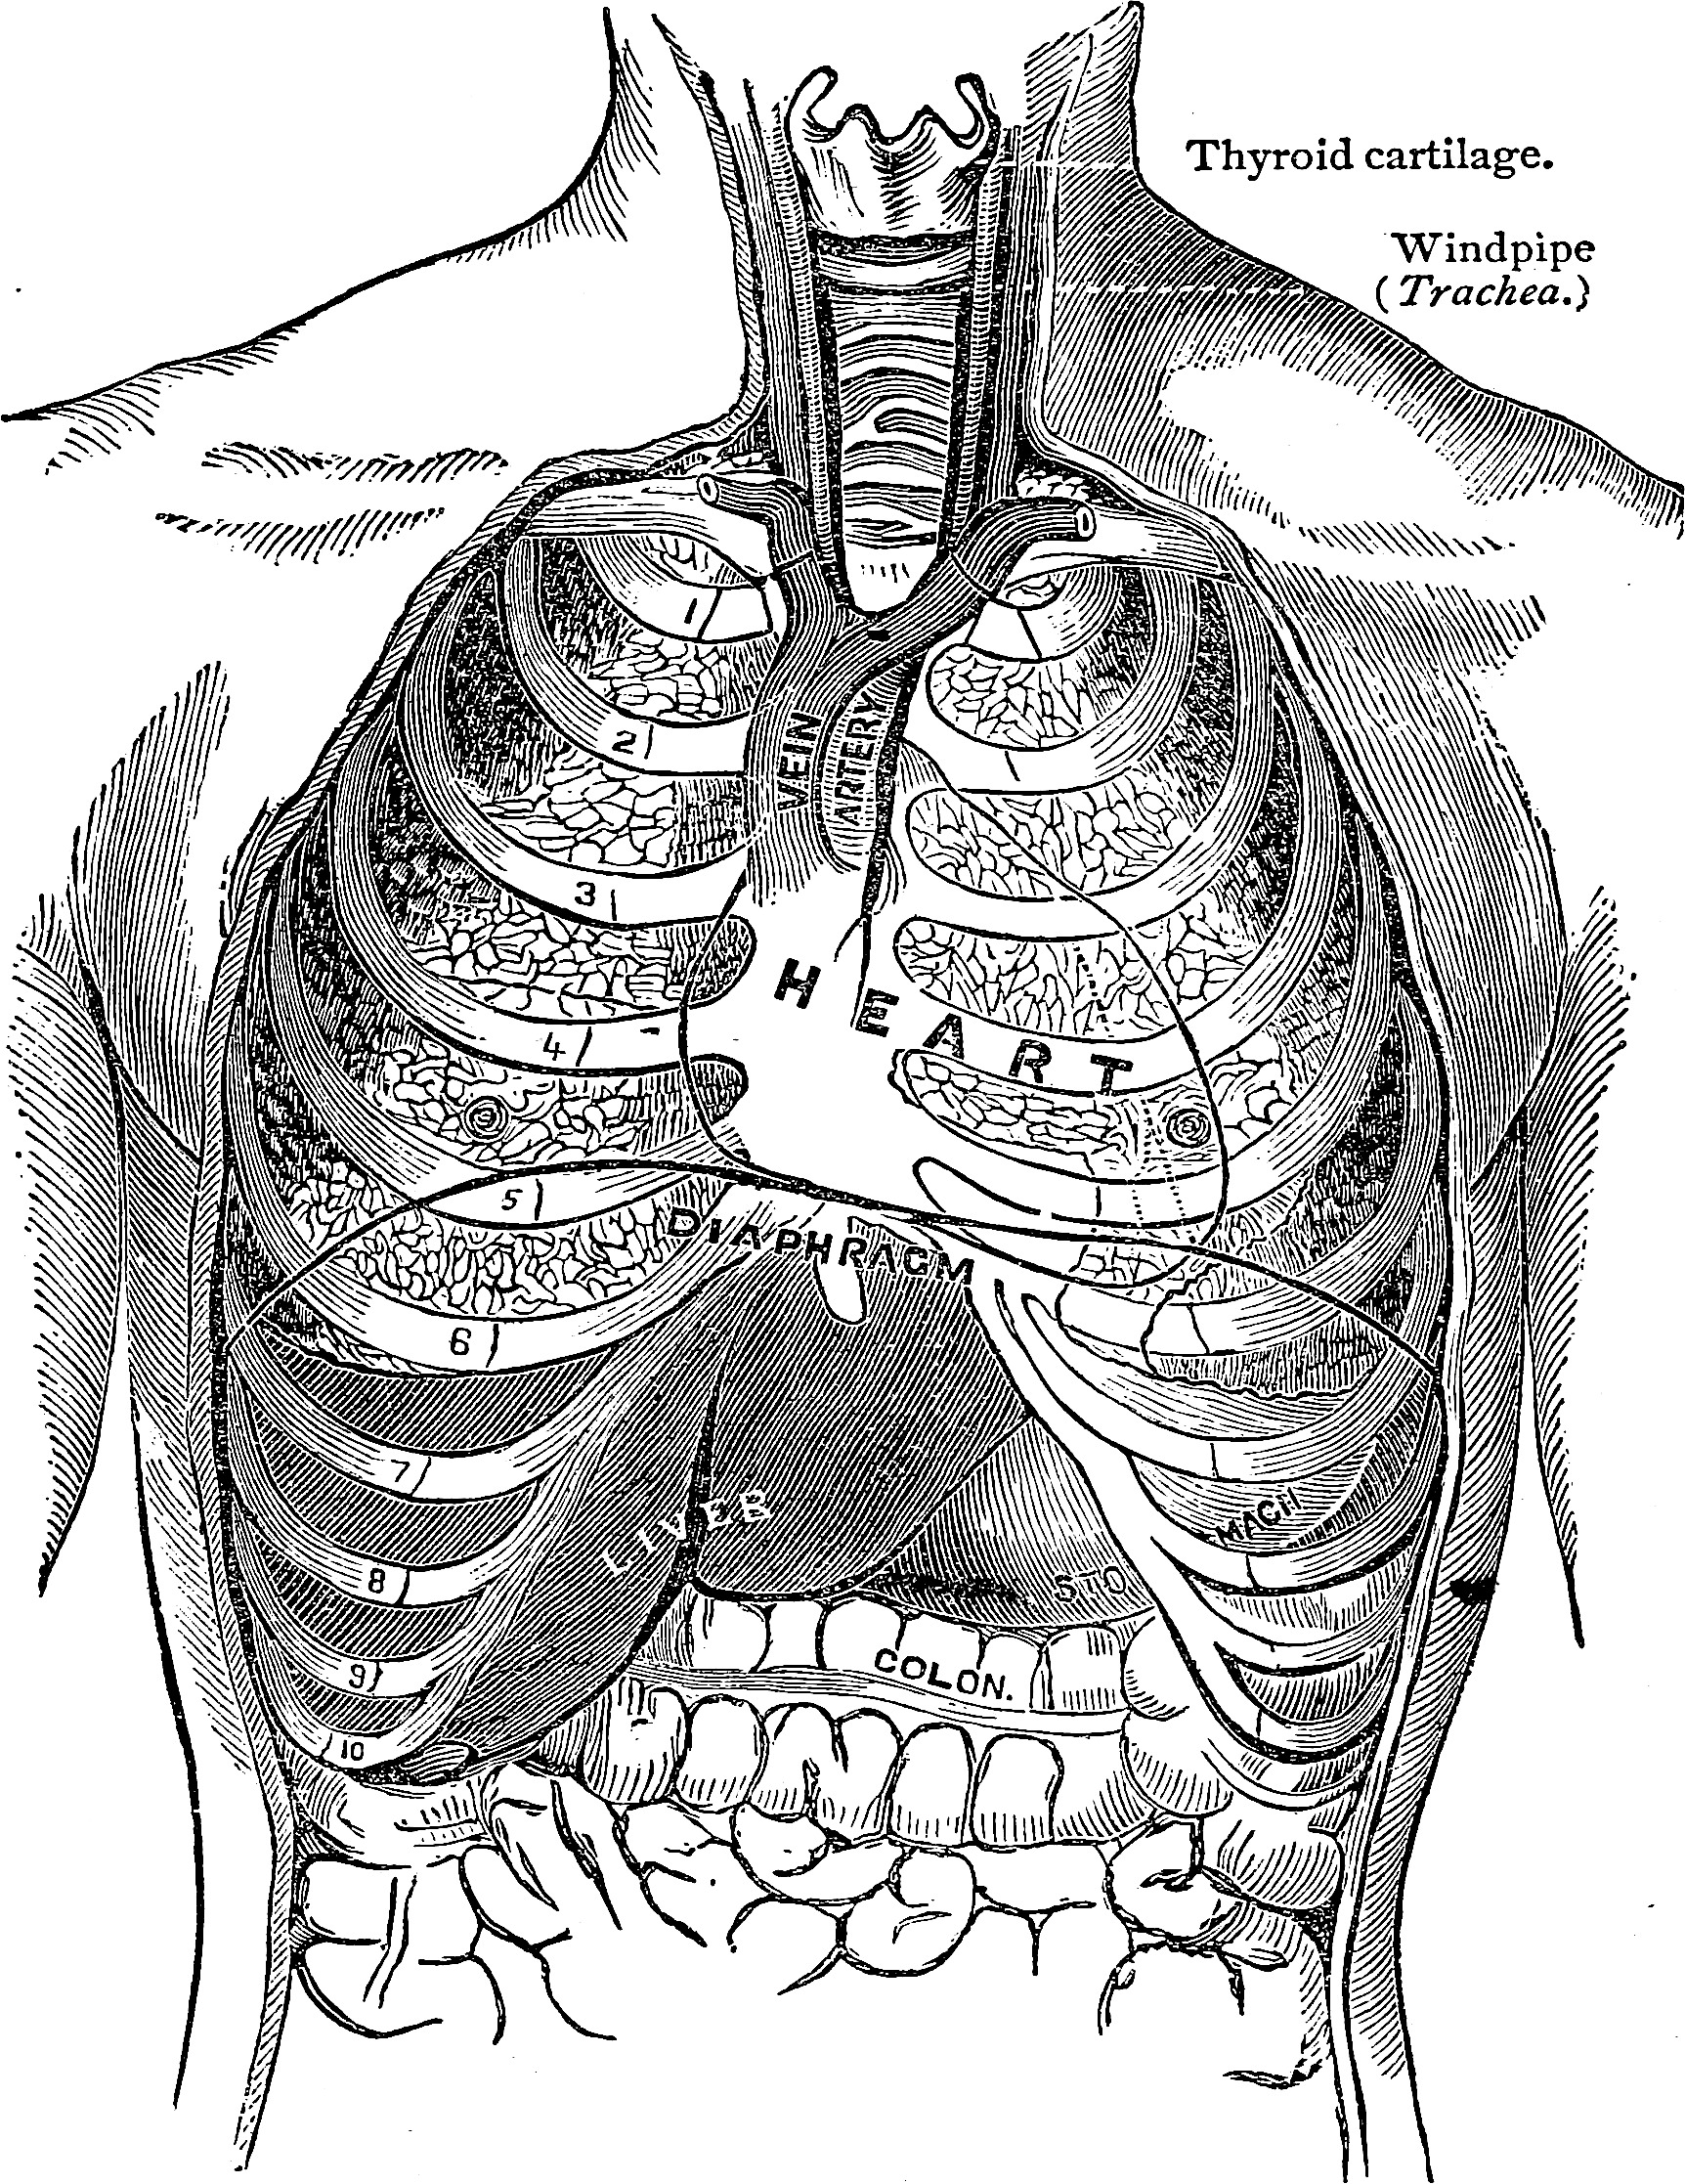
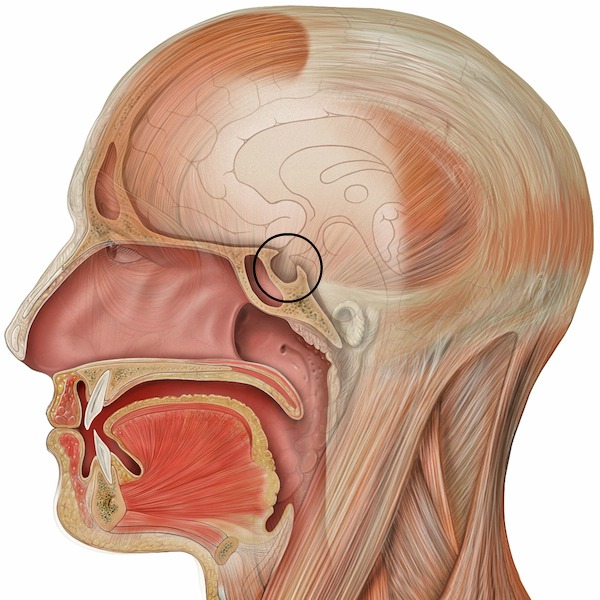
This first image is from the ubiquitous Gray’s Anatomy. The sella turcica is circled, and labeled “Hypophisis” by the illustrator. Hypophisis is another word for the pituitary gland, which rests in the bony cradle.
Sella Turcica from Gray's Anatomy


In this second illustration by Patrick Lynch (made in collaboration with Carl Jaffe, MD, cardiologist), we can see the pituitary hanging down into the sella turcica. Note the structure’s position relative to the soft palate and oropharynx.

Sella Turcica by Patrick Lynch


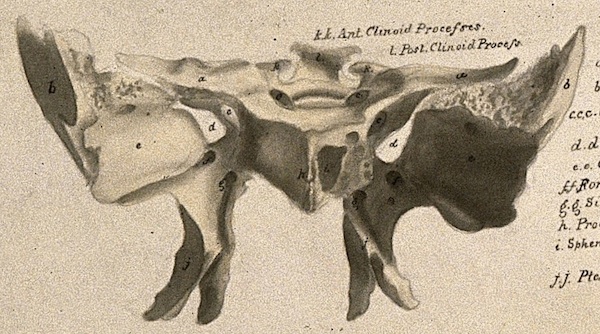
This third image is from a 1910 German Anatomy Textbook, Der ärztliche Ratgeber in Bild und Wort. Atlas und Hausbuch für Gesunde und Kranke. Here, you can also see the pituitary, looking like a couple of little eggs nestled into the Turkish saddle.

Sella Turcica from German Anatomy Textbook


I like to think of vibrating the sella turcica, because for me the sensation of vibration in the area brings more awareness to the soft palate.

  1. To help imagine its location, place your finger at the top of your nose, at the bottom of the forehead. This is roughly the level of the sella turcica. Imagine a line going straight back from here.
  2. Find the outside edges of your eye sockets. Move your fingers back from here about an inch. Your fingers will now be on your temples, perhaps in the vicinity of your hairline (unless, like me, you’re bald). Imagine a line going through your skull, between your fingers. This line intersects the sella turcica
  3. Move your fingers back and forth between these two imaginary lines. Can you visualize where they intersect? As you do this, hum or sing a soft note, making sure you try different pitches and registers. Can you feel vibration in this area?

Give it try! Perhaps while you’re practicing your Vocal Function Exercises!

Anatomy and Interpretation: What the Singer should Know

Skeleton from Andreas Vesalius' De humani corporis fabrica, published in 1543. The words on the tomb are from Silius Italicus' epic poem Punica, and reads: "Death robbed him of all his beauty: a Stygian hue spread over his snow-white skin and destroyed his comeliness." (Translated by J.D. Duff.) Image courtesy of the Wellcome Library, London.
Skeleton from Andreas Vesalius’ De humani corporis fabrica, published in 1543. The words on the tomb are from Silius Italicus’ epic poem Punica, and reads: “Death robbed him of all his beauty: a Stygian hue spread over his snow-white skin and destroyed his comeliness.” (Translated by J.D. Duff.) Image courtesy of the Wellcome Library, London.
The study of anatomy is as much art as science. And, though it depends on death — specifically, the cutting open of dead bodies — it has striven, from its earliest days, to show life. Take, for instance, this image from Andreas Vesalius’ De humani corporis fabrica (On the construction of the human body). No mere skeleton, this! He leans on a tomb (his own?) and gazes (despondently? pensively?) at another skull. Meanwhile, his bones are all neatly labeled so we can look them up in the accompanying legend.

I encourage singers to learn anatomy. (Actually, I think everyone should learn anatomy.) Luckily for us, we live in a time of unprecedented access to information, and it’s relatively easy to find good anatomical illustrations to aid you along the way. There are anatomy apps for smart phones and tablets, videos to watch on the interwebs, and even websites where you can look at 3-D illustrations that can be moved hither and thither with the flick of a mouse. Imaging technology such as real-time MRI has advanced so we can even see films made of the body in vivo.

Before you set out, there are a few things the intrepid singing student of anatomy should bear in mind.

  1. Anatomical illustrations are interpretations.
  2. Singers are familiar with the idea of interpretation, of course. Even though the “bones” of a song remain the same, the performance can vary enormously from one singer to the next.

    For the artist-anatomist, interpretation involves things like choosing media, figuring out how to show a three-dimensional form in two dimensions, deciding how to “edit the body for clarity” — what structures to include and what to leave out. For instance, here are two pictures of the thorax and upper abdomen showing the organs (click on the image if you want to download the full-size version and do some coloring):

    Illustration of the organs of the thorax and upper abdomen from Frederick Garbit's 1880 <em> The woman's medical companion and guide to health</em>.
    Illustration of the organs of the thorax and abdomen from Johannes Sobotta's 1906 <em>Atlas and Text-book of Human Anatomy</em>

    The first illustration is from Frederick Garbit’s 1880 book The woman’s medical companion and guide to health. The second is from Johannes Sobatta’s 1906 Atlas of Human Anatomy. I cropped the latter so both illustrations would show roughly the same area.

    Now grab your favorite kid and play the game of: What’s different about these pictures? Here’s one hint: The guy on the right doesn’t have a heart, and part of his liver is missing. But this helps us see what is behind these structures. What else do you notice?

    The illustrator isn’t the only interpreter. Bodies are all different. We may have the same basic structure granted by evolution, but that structure is mediated by the genes we’re born with, and also by what we do throughout our lifetime: How we think and move, what we eat, our sleep patterns, how we manage our emotional lives and cope with stress, and what chemicals we introduce into the body, either willfully or involuntarily (those kids in Flint sure didn’t choose to drink lead-tainted water). The artist-anatomist is drawing someone’s body, and those bodies have their own unique stories to tell.

    So when you’re setting out to understand some aspect of anatomy, look at as many different illustrations as possible. After all, you wouldn’t claim to understand singing after listening to just one voice!

  3. Learning anatomy will not be very useful to you if it’s only theoretical.
  4. You need to start understanding it in your own body (and yes, this means you’re going to have to touch yourself). For instance, in this drawing, we can see that the dome of the diaphragm is roughly at the level of the fifth ribs, which I’ve highlighted in orange for you:

    Frederick Garbit illustration of the thorax showing the position of the fifth ribs.

    Have you ever tried counting your ribs and figuring out where that is? Start from the top of your chest, at either side of the sternum. The first rib is hard to feel, as it dives below the collar bones. The first set of ribs you will be able to clearly feel are your second ribs. Count down from there. Remember, always count your own ribs before assisting another passenger. Also, be patient. This is tricky, especially if you have big boobs. In the end, you may realize that the domes of your diaphragm (you have two – one on the right, one on the left) are higher than you thought.

  5. Sometimes you have to reorient the map to make sense of where you’re going.
  6. “What’s underneath the diaphragm?” You ask, as you’re working to expand your understanding of breathing. Perhaps you see this illustration and think: “Huh. The liver!”

    Frederick Garbit illustration of thorax and abdomen, with the liver highlighted.
    “Huh. The liver! It’s green!”

    You decide to follow my suggestion from above and look at some different illustrations. Here’s one from Johannes Sobatta’s 1906 Atlas showing a cross-section of the abdomen. The red line in the above illustration shows the approximate level of the cross-section.

    Let’s just say that it’s the same guy as in the illustration above. We’re facing him, and we’ve just cut him in two, and now, still facing him, we’re looking down at the top edge of that slice.

    A cross-section of the abdomen from Johannes Sobatta's 1906 <em>Atlas</em>.
    The front of the body is here.


    But honestly, we don’t care about this guy’s liver. We’re just trying to figure out our own, and to do so using this image, we’ll flip it around thusly:


    Cross-section of the abdomen oriented to help you understand your own body.
    This edge is now the back of the body.


    Now the legends are all up-side down, but we can look at this cross-section and see that the liver is predominantly on the right (though it clearly crosses the mid line – basically, the liver is huge) and that the stomach and spleen are on the left. We see the vertebra at the back of the body. (It’s worth noting how much in the center of the body the “back” is.)

    Orienting the “map” this way makes it easier to use when we’re thinking about our own bodies.

    As a singer, I think about the liver a lot. Most don’t. So it’s only fair to offer another map-rotating example from a structure singers are more likely to think about, the larynx.

    The following illustration comes from the 1918 edition of Gray’s Anatomy. Because this material is in the public domain, you see it used all over the place, such as in Scott McCoy’s excellent book Your Voice: An Inside View. We can clearly see the vocal cords – chordae vocalis – at the center of the drawing. (These days, you’re more likely to hear them referred to as vocal folds.)

    Superior view of the larynx and vocal cords from <em>Gray's Anatomy</em>.
    Front of the body is here.


    The illustration, like the previously-discussed cross-section of the abdomen, shows the larynx from above, in someone we are facing (as if we’re the clinician about to shove a scope up the nose and down the throat to have a look).

    If I want to think about the larynx in my own body, I find it much more useful to look at the image thusly:


    Superior view of the larynx from <em>Gray's Anatomy</em> inverted to help us understand its position in our own bodies.
    This edge is now the back-of-the-neck side of the larynx.


    The inverted-V shape at the (now) top of the image is the front edge of the thyroid cartilage, which you can distinctly feel in your neck – your Adam’s apple.

  7. There is a downside to studying the dead to understand life.
  8. The living body moves.

    Life and movement are intertwined.

    The good news is that if you are reading this, you have a living specimen right to hand — yourself!

    We should let the many souls who have come before us — the artist-anatomists and those that contributed the bodies they studied (often without knowledge or consent) — be a source of inspiration for us. They have opened their bodies to us in a way we cannot (while living). Let’s be grateful to their contributions to the world of knowledge, and learn what we can from them.

Breathing, Holding, and Singing: A Primer on the Absurd

An illustration showing the diaphragm's position relative to the heart lungs (above) and abdominal muscles (below).
The diaphragm descends on the inhale, pulling on the lungs, which pull on the trachea, which pulls on the larynx. Illustration from Frederick Garbit’s (1880) The woman’s medical companion and guide to health.
When I teach breathing to singers, I tend to take a “try this and see what you feel” approach. I can’t clamber into anyone else’s body and feel what they’re feeling. In my view, it’s up to students to develop their own lexicon of sensations related to the breath. I can, at best, offer accurate information about different aspects of breathing: things to notice.

Like this: Start with an inhale. Your diaphragm descends, pulling your lungs and heart with it. Your lungs are connected to your trachea, which you can feel at the base of your neck, just above your sternum. Your trachea is connected to your larynx. On a deep inhale, you may be able to feel your larynx (Adam’s apple) move slightly downward. Notice. What happens when you start to speak or sing?

***

I like to collect odd instructions I’ve heard given to singers on the subject of breathing. Here’s one:

Lift your shoulders and hold them up so you can make more space for your lungs.

My lungs have always liked a little space, so while I’m at it, maybe I should get a bigger house? What the hell, maybe I should invade some other country so my lungs will have enough space!

Here’s another:

Squeeze your butt cheeks together and hold them so tight you couldn’t fit a tram ticket in there.

This one is clearly a partner exercise, with one person doing the cheek squeezing, and the other checking to make sure they can’t “fit the tram ticket in.” Don’t have a tram ticket? No worries. I’m sure your voice teacher can give you a business card to use instead.

And another:

Tense up your abdominal muscles as if someone is about to punch you and hold them there to support your singing.

Singing is, after all, very dangerous (especially if you’re invading other countries to make space for your lungs). You never know when someone might come along and punch you.

Okay, one more:

Inhale, let your ribs expand and hold them in this position for as long as possible on the exhale.

Hey, just as an experiment, why not try all four things at once? Lift your shoulders and give your lungs a little space. Tense up those buttocks, lest someone mistake you for a turnstile and try and “board your tram.” Inhale and expand your ribs. Tense up your abdominal muscles to support the exhale, and be sure keep your ribs out.

Ready to sing?

***

The above methods all have something in common: the injunction to hold.

When you hold, you are making something that should move static.

But breathing is dynamic. It involves movement of many bones, muscles, ligaments and organs. With all of these moving parts to organize, it’s no wonder the singer might sometimes take the rearranging-the-living-room-furniture approach to breathing: “Put this over here, that over there, and can you hold this picture up for me so I can see how it all looks?”

Let’s go back to noticing.

  1. Take a nice big inhale. Feel your rib cage expanding in all directions. (If you let your ribs move, you’ll probably find that your lungs have all the space they need!)
  2. Exhale on a sibilant [s] (hiss). The lungs are very elastic. If they weren’t anchored to the body wall, they’d crumple up into little balls. In a resting breath, we let this elasticity do most of the work of the exhale. See if you can sense this elastic recoil as you slowly exhale on the [s]. How long can you go without activating the abdominal muscles? (If you put your hands on your stomach, you should be able to feel when your abdominal muscles tense up.) Can you feel the movement of the exhale on all sides of your rib cage?
  3. On your next exhale, try singing one of the long-tone vocal function exercises, using just the elastic recoil of the lungs to provide the necessary air pressure. You won’t be able to sing the note as long, but it’s interesting to notice how much work the elastic recoil will do for you. (For me, this exercise has some of the qualities — such as ease and pleasure — of a sigh. An elongated sigh, mind you.)

    You cannot sing on the elastic recoil of the lungs alone. There has to be some balanced use of abdominal wall musculature. However, singers also need to learn to be able to feel the elastic recoil in the lung so they can tap into it, and let it do its share of the work.

Play with it. See what you notice.

Every breath is different.

What Once Was Solid

Ah, January!

Skull detail by Leonardo da Vinci
Leonardo grabs his skull and hoofs it on over to winter.
If you’re north enough, you’ve taken to shoveling your water into piles, and if you live in an old and drafty place like I do, Jack Frost comes in the night and decorates your windows with one-of-a-kind works of art. January in the north is when everything gets cold and hardens. What better time to think about things we perceive as solid? So grab hold of that hard head of yours, and let’s take a moment to talk about the skull.

Seattle poet Greta Nintzel sometimes calls the skull a “calcium cage.” Until recently, I admired the phrase as an apt description for my own noggin’: a bony container for the wizard running my body machine.

Enter the craniosacral therapist. She put her hands on my head and made the subtlest of movements. I started to think: maybe I’m not as hard-headed as I thought.

Craniosacral therapy is based (in part) on the idea that the bones of the skull retain some amount of movement at the sutures where they grow together during development2. I have a picture in my mind of the half-baked, developing skull as a group of islands, slowly expanding towards one another until they can start to merge together, first as continents, and then as a whole, head-shaped planet.

Before the craniosacral therapist put her hands on my skull, I had no thought of there being movement in the skull itself, my oh-so-solid calcium cage. And now? I think of the bones as having slightly lubricated edges, as if they are moored to one another on the sea of my gray matter, bobbing and floating (while I dreamily listen to the halyards slapping against the mast).

There is some disagreement on what should or shouldn’t be counted in this bony island archipelago, but for our purposes, let’s say there are 22 bones of the skull, as in this disarticulated model (Legos for anatomy geeks):

Disarticulated Skull

 
And here it is again, put back together:

skull model anterior view
skull model sagittal view


Among all these, I want to draw your attention to the maxillary bones, which are just below the nasal opening (teal in the images above). They hold your upper teeth and provide most of the surface of your hard palate. Here is another image from the 1918 edition of Gray’s Anatomy:

Maxilla from Gray's Anatomy


Previously, I introduced you to Joseph Stemple’s Vocal Function Exercises, and promised some things to contemplate while practicing them. So let’s vibrate the maxilla.

  1. As you hum, see if you can sense vibration in this bone (try different pitches). It’s easy to palpate its location, through the skin and muscles of your face, and also inside your mouth. If you feel the midline of your hard palate with your tongue, you can probably find the seam where the two halves of the maxilla join together. Can you feel the hum vibrating in different areas of the bone and in your upper teeth?
  2. The roof of your mouth is also the floor of your nose. Inhale slowly through your nose. Can you use the sensation of air coming in to help you sense the top (superior aspect) of the maxilla? What happens if you think of the hard palate widening slightly with the inhale?
  3. In the Vocal Function Exercises, we learned to sing long-tones on what I call the [o] inside an [u] vowel. Here, once again, is an example of the vowel:


    Because the embouchure of the closed [u] vowel is so tight, it can be tiring to hold the position for the duration of the exercise. To counter this, I like to imagine I can relax my upper teeth, as if I’m “letting them go”, and let them buzz in their sockets a little.

And hey, once you’ve vibrated the maxilla, we’ve only 20 bones to go in our vibratory exploration of the bones of the skull (the maxilla counts as two bones, with left and right halves).

Have fun!

Warming up the Voice with Vocal Function Exercises

Want to sing happily into your wise years? All the more reason to practice your vocal function exercises! Old Woman Singing by Dutch painter Gerard van Honthorst (1590-1656).
Imagine a different sort of violin. Rather than four strings, it has just one, and you don’t have to finger it to change the note. Instead, you must think the note; the string will automatically change its length and thickness to suit. The body of the violin is also continuously changing its shape as you play. Granted, this is awkward, but at least you only have one string to worry about!

Of course, what I’m trying to do here is imbue the violin with some of the qualities of the voice. The string of my one-stringèd violin represents the vocal folds, which vibrate to produce a tone. The body of the violin is the vocal tract, which adds resonance and amplification to the vibration so it can be heard on the other side of the hall. As for the other aspects of the voice, the breath, the articulators (mouth, tongue, lips, teeth — without which we’d have no consonants), I think I’ll hang up my hat on those rather than try and extend the analogy.

In short, the voice is a complicated instrument with a tremendous amount of variability in all of its parts. So how do you train the coordination between these parts?

Perhaps you do something to relax your body; to release tension in your neck, shoulders, and jaw, for example. Maybe you do something to warm up your breath. You might have a process to prepare yourself mentally, to clear the emotional detritus of your day. Perhaps — before you get down to the business of smoothing over your vocal galumphs with messe di voce exercises, with glides and vowel dances, with long tones and passage work — you engage in a ritual procrastination during which you clean the house, walk the dog, or “practice” yoga by lying in child’s pose and moaning3.

Enter my latest favorite warm-up: the Vocal Function Exercises developed by speech pathologist Joseph Stemple4 and colleagues5. As I understand it, their primary goal is to strengthen the muscles involved in phonation at the level of the larynx. Most recently, I’ve been using them to rehabilitate my voice after a month with bronchitis (which led to fantasies about next year’s Christmas CD: Meditations on Not Coughing). I’ve also found them very effective at improving the coordination between the breath, the vibration of the vocal folds, and the “placement” of the tone.

I will be honest: these exercises can be a little bit boring. But oh, the results! Give them a try.

Vocal Function Exercises

In the coming weeks, I will offer up some movement meditations I’ve used to keep myself engaged with these exercises. Because: the more mindful you can be in your practice, the more effective and transformative that practice will be. And variety is the spice of mindfulness!